Symmetria is a demo theme for AstroBaaS. Treatments, prices, the team, free appointments and the journal come from a live CMS. The clinic and everyone in it are invented.All demos

Open Monday to Friday 07:00 to 21:00, Saturday 08:00 to 14:00.

+30 210 000 7516

SymmetriaPhysiotherapy in PangratiBook

Home exercises

Ασκήσεις για το σπίτι

The exercises we give most often, drawn and written the way we give them to patients. They are a good start for most people. They are not a plan made for you, which is what an appointment is for.

Three rules for all of them

  1. Mild discomfort is fine. Sharp pain means stop, or go less far.
  2. Pain that has settled by the next morning is fine. If it has not, do less next time.
  3. Little and often beats a lot once a week.
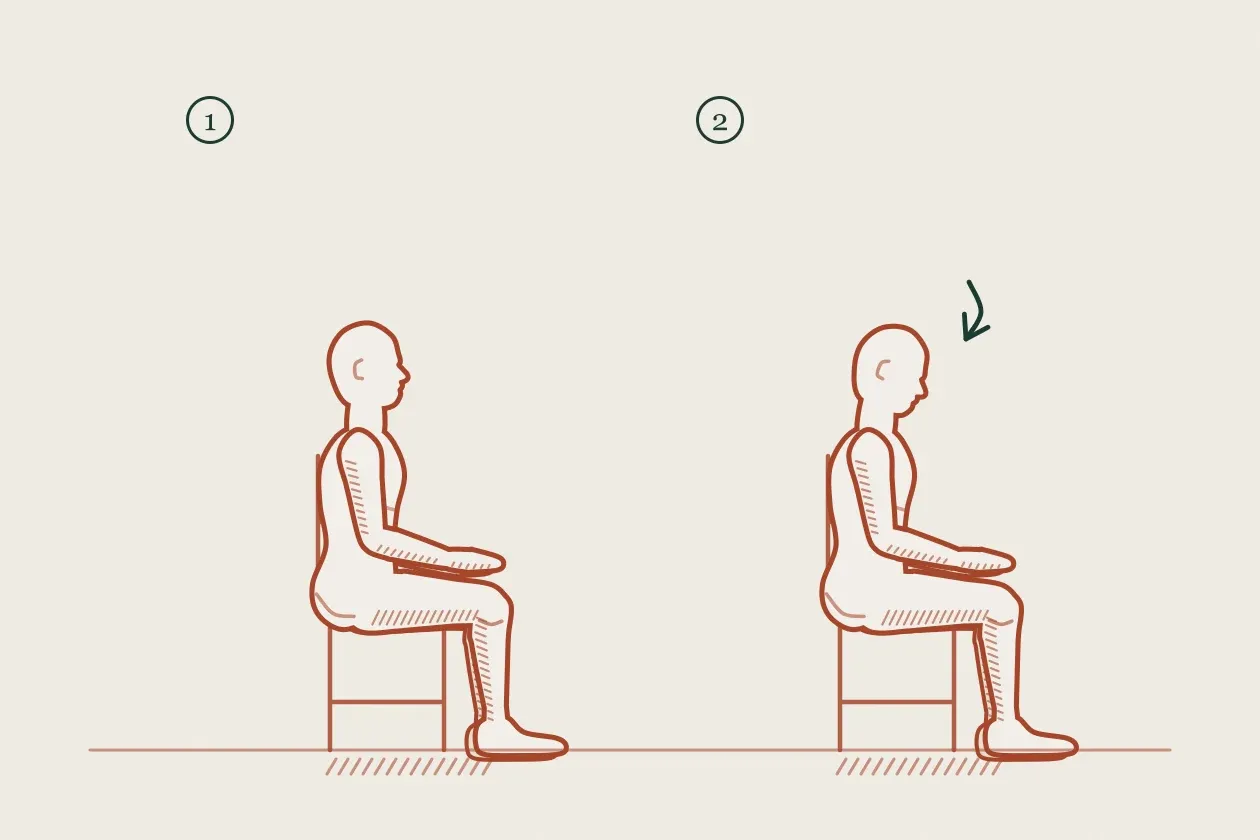
Exercise drawing in two steps: a seated figure looking ahead, then nodding the chin gently down

Chin nods

For neck pain and stiffness, neck

  1. Sit tall, with your back against the chair.
  2. Look straight ahead and gently nod your chin down, as if saying a small yes.
  3. Hold for five seconds. You should feel the front of the neck working and the back of the neck lengthen.
  4. Come back to looking ahead. Do not push your head back.

10 slow nods, three or four times a day. A good one to do at a red light.
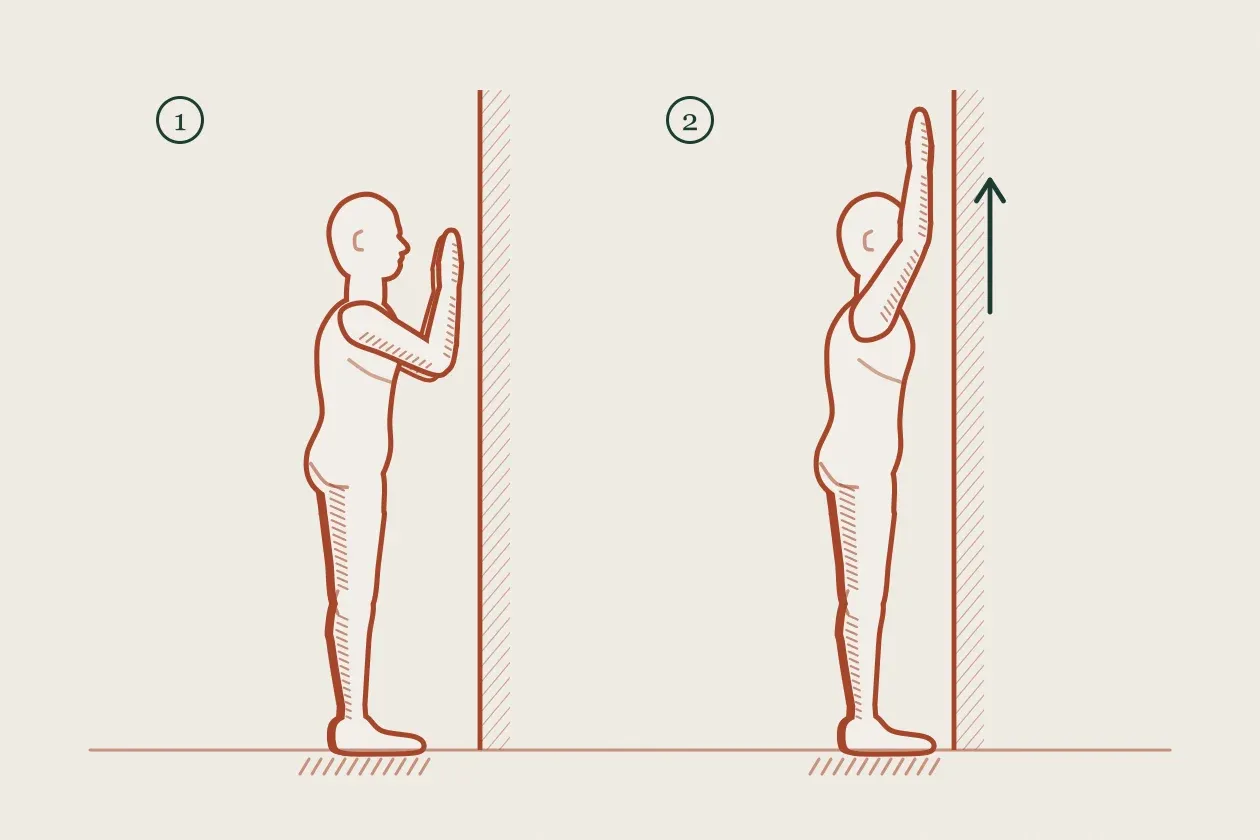
Exercise drawing in two steps: a figure with forearms on a wall at shoulder height, then slid up overhead

Wall slides

For shoulder pain and the rotator cuff, shoulder

  1. Stand facing a wall, forearms on the wall at shoulder height, elbows bent.
  2. Gently press your forearms into the wall.
  3. Slide them up as far as is comfortable, keeping the pressure.
  4. Slide back down slowly.

8 to 10 slides, once or twice a day. Some discomfort is fine; sharp pain means stop lower.

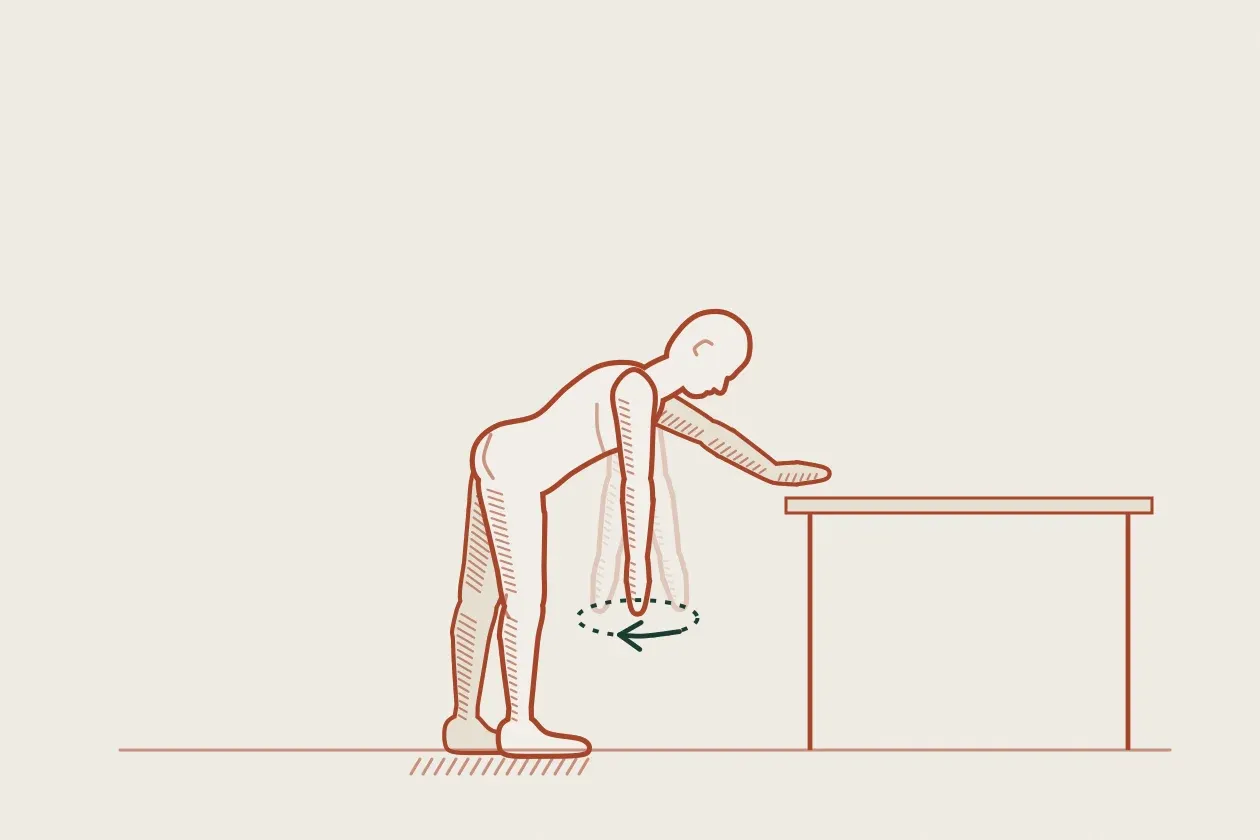
Exercise drawing: a figure leaning on a table with one arm hanging and swinging in small circles

Pendulum swings

For frozen shoulder, shoulder

  1. Lean forward with your good hand on a table.
  2. Let the sore arm hang down, relaxed, like a rope.
  3. Rock your body gently so the arm swings in small circles.
  4. Change direction after ten circles.

30 seconds each way, a few times a day, especially before sleep.

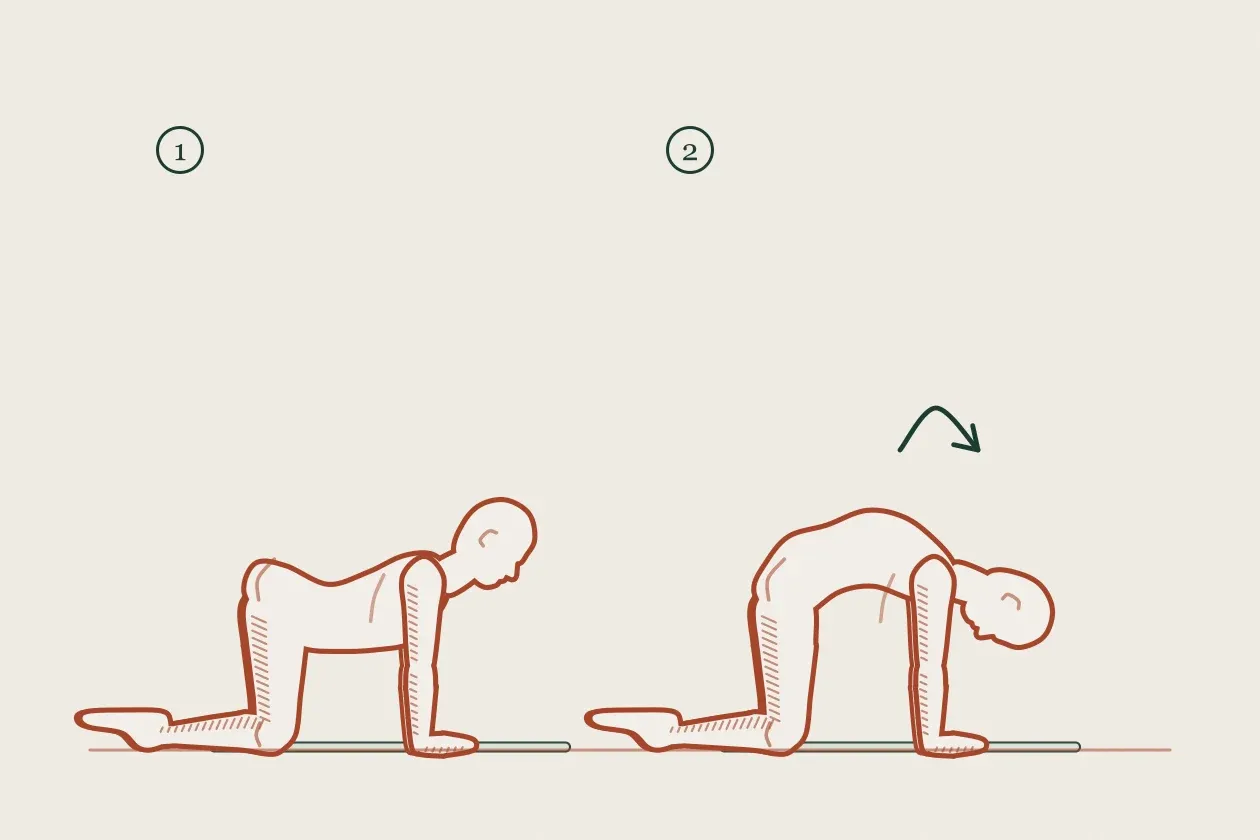
Exercise drawing in two steps: a figure on all fours with the back gently arched, then rounded

Cat and camel

For low back pain, back

  1. Kneel on all fours, hands under the shoulders and knees under the hips.
  2. Breathe in and let your back sag gently, looking slightly forward.
  3. Breathe out and round your back up towards the ceiling, tucking your chin.
  4. Move slowly between the two, only as far as feels comfortable.

10 slow movements, morning and evening, or whenever the back feels stiff.

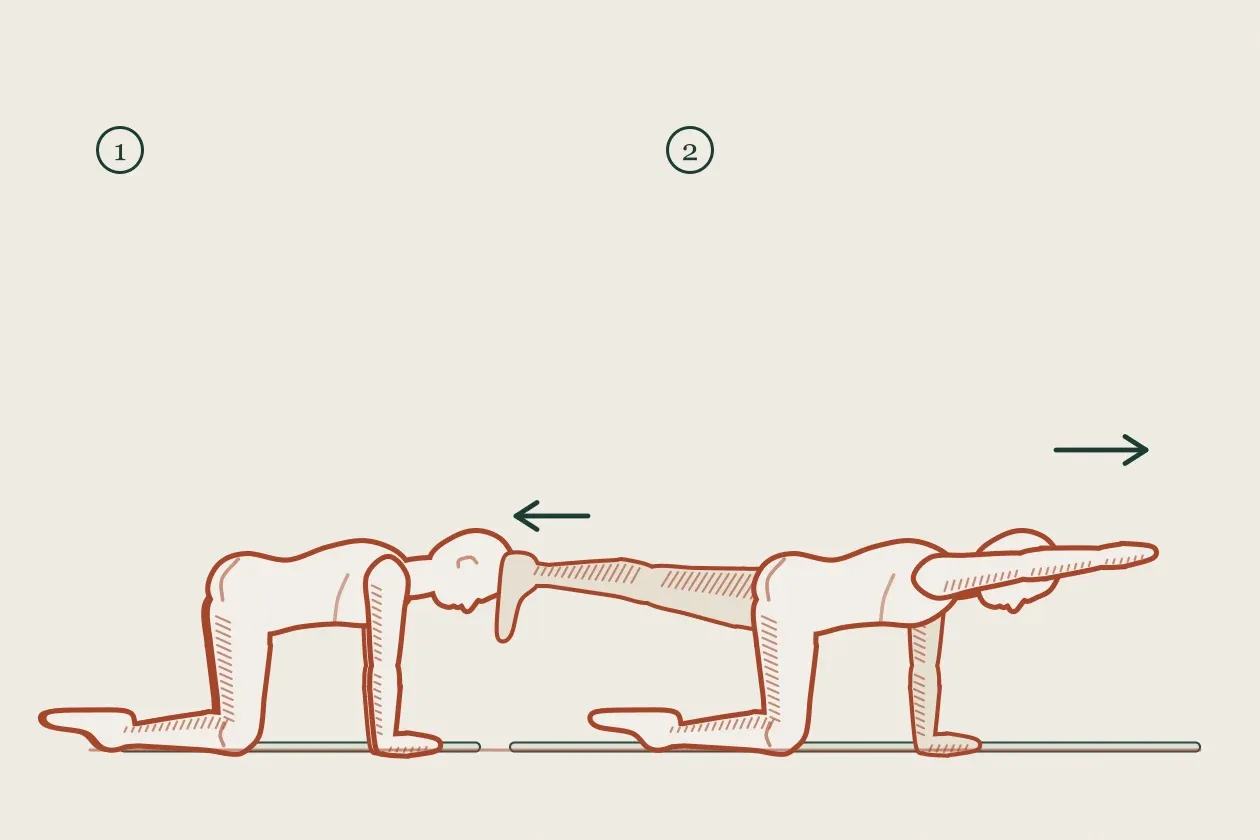
Exercise drawing in two steps: a figure on all fours, then reaching one arm forward and the opposite leg back

Bird dog

For sciatica, back

  1. Kneel on all fours, back flat, hands under the shoulders.
  2. Reach one arm forward and the opposite leg back, slowly, keeping the hips level.
  3. Hold for five seconds without letting the back sag.
  4. Return and change sides.

6 on each side, once a day, when the leg pain allows it.

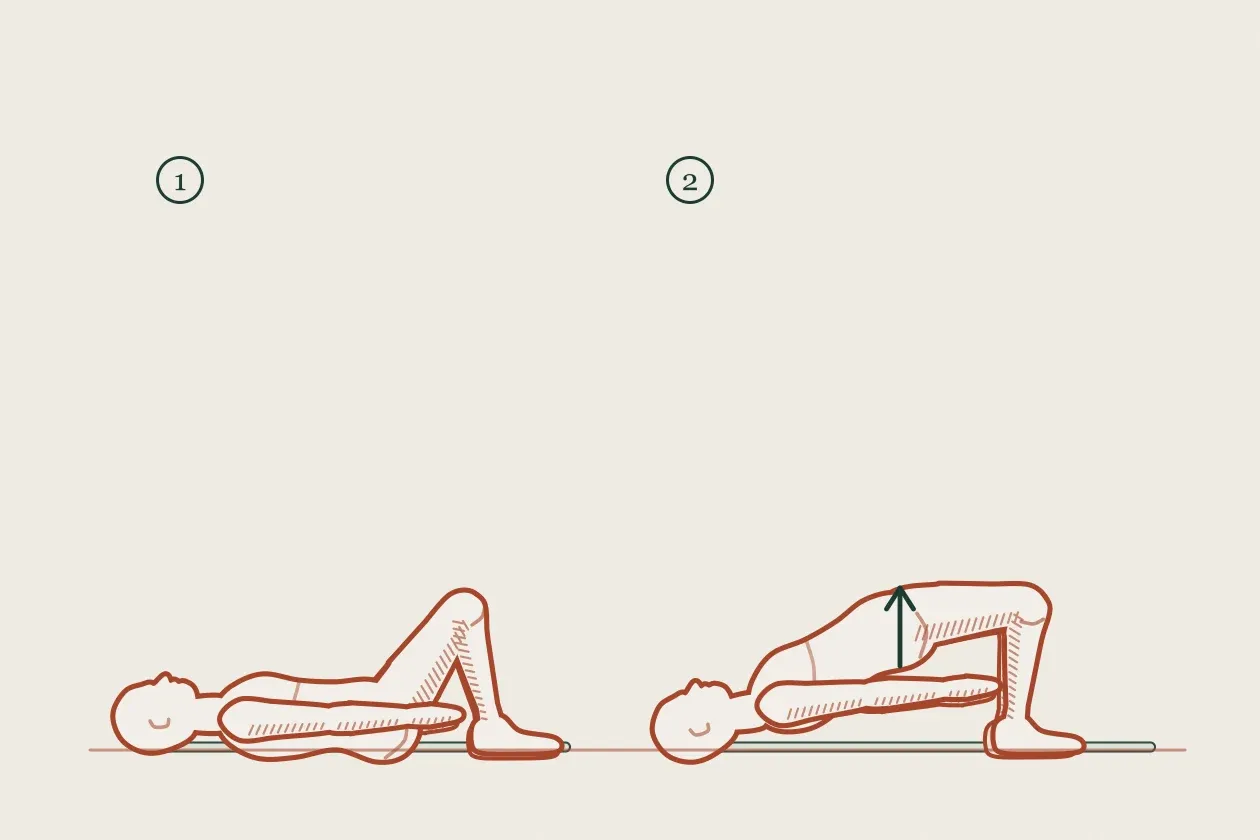
Exercise drawing in two steps: a figure lying with knees bent, then lifting the hips into a bridge

Bridge

For hip and buttock pain in runners, hip

  1. Lie on your back, knees bent, feet flat and hip-width apart.
  2. Press through your heels and lift your hips until your body is in a straight line from shoulders to knees.
  3. Hold for three breaths.
  4. Lower slowly, one part of the spine at a time.

3 sets of 10. When it is easy, try it with one foot lifted.

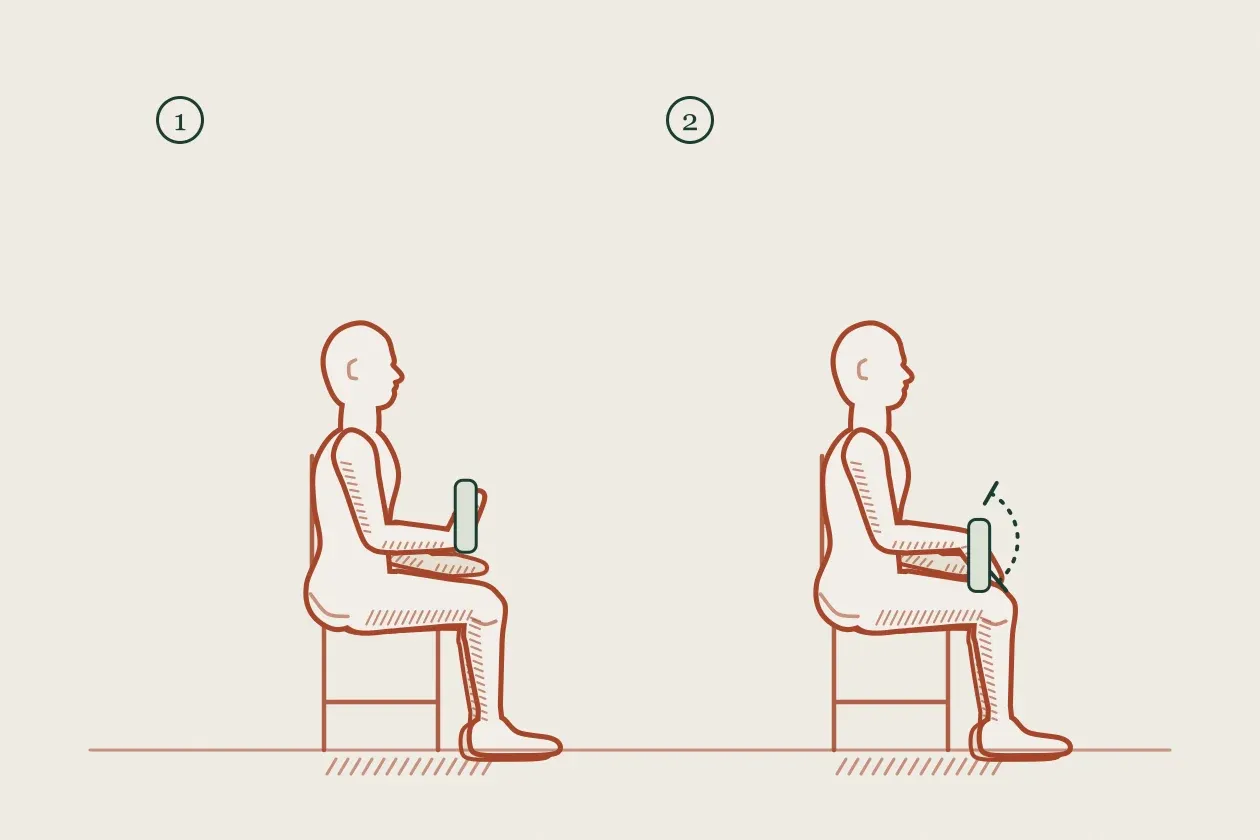
Exercise drawing in two steps: a seated figure with the forearm on the thigh, lifting and slowly lowering a bottle of water

Slow wrist lowering

For tennis elbow, elbow and hand

  1. Sit with your forearm resting on your thigh, palm down, hand over the knee.
  2. Hold a light weight: a half-litre bottle of water is fine.
  3. Use your other hand to help lift the wrist up.
  4. Lower it slowly on its own, counting to four.

3 sets of 15, once a day. Mild pain that settles by the next morning is fine.

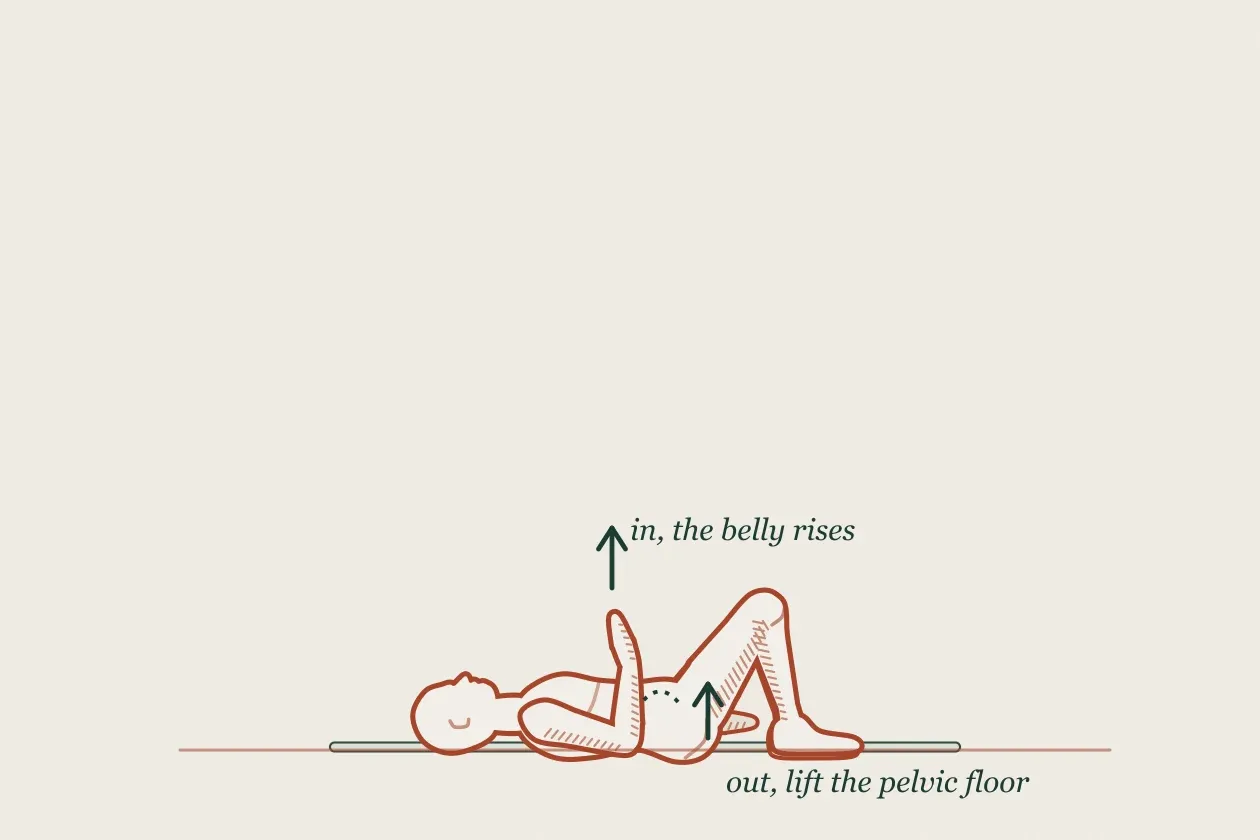
Exercise drawing: a figure lying with knees bent and a hand on the belly, with arrows for breathing in and out

Breathing with the pelvic floor

For pregnancy and after birth, pelvic health

  1. Lie on your back with knees bent, one hand on your belly.
  2. Breathe in slowly and let the belly and the pelvic floor relax and widen.
  3. Breathe out and gently lift the pelvic floor, as if stopping wind, and let the lower tummy draw in.
  4. Relax completely before the next breath.

10 breaths, twice a day. In the weeks after birth, start whenever it feels comfortable.

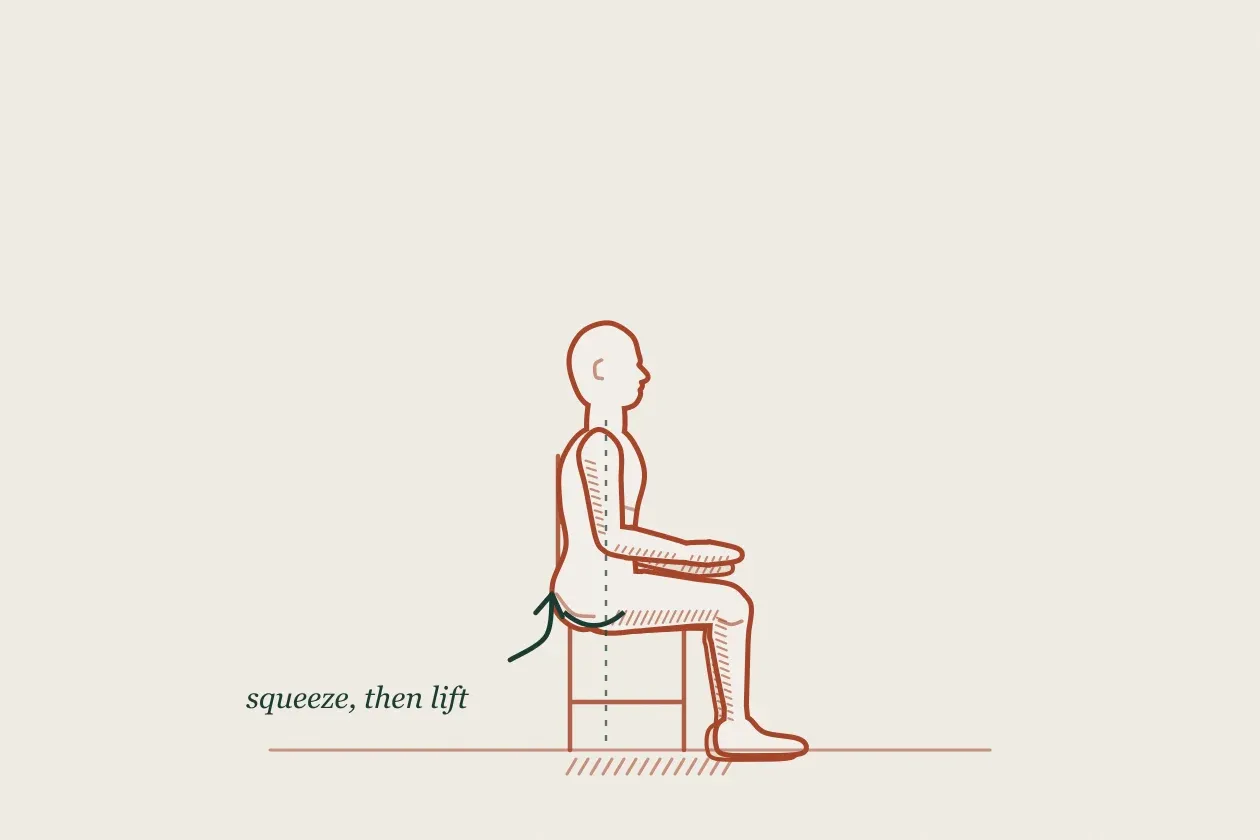
Exercise drawing: a figure sitting upright on a chair, with a small curved arrow lifting under the pelvis

Squeeze and lift

For leaking when you run or jump, pelvic health

  1. Sit upright on a firm chair, feet flat.
  2. Squeeze around the back passage and the front passage, then lift, as if stopping wind and the flow of urine.
  3. Hold for up to ten seconds while breathing normally.
  4. Let go completely and rest for ten seconds.

10 long holds and 10 quick squeezes, three times a day.

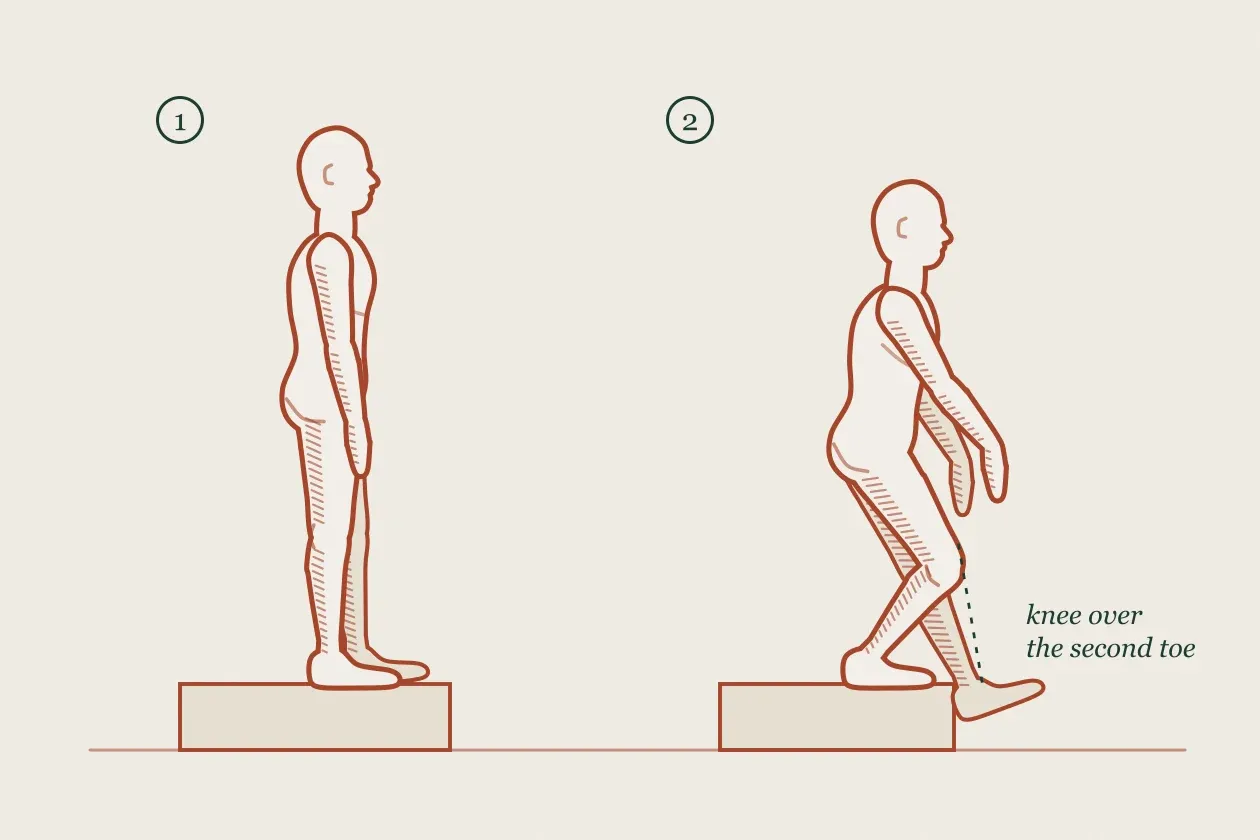
Exercise drawing in two steps: a figure standing sideways on a stair, then bending one knee to lower the other heel

Step-downs

For pain at the front of the knee, knee

  1. Stand sideways on the bottom stair, holding the rail.
  2. Slowly bend the knee on the stair and lower the other heel towards the floor.
  3. Keep the knee in line with your second toe.
  4. Touch the heel down lightly and straighten back up.

3 sets of 8, slowly. Go only as low as is comfortable.

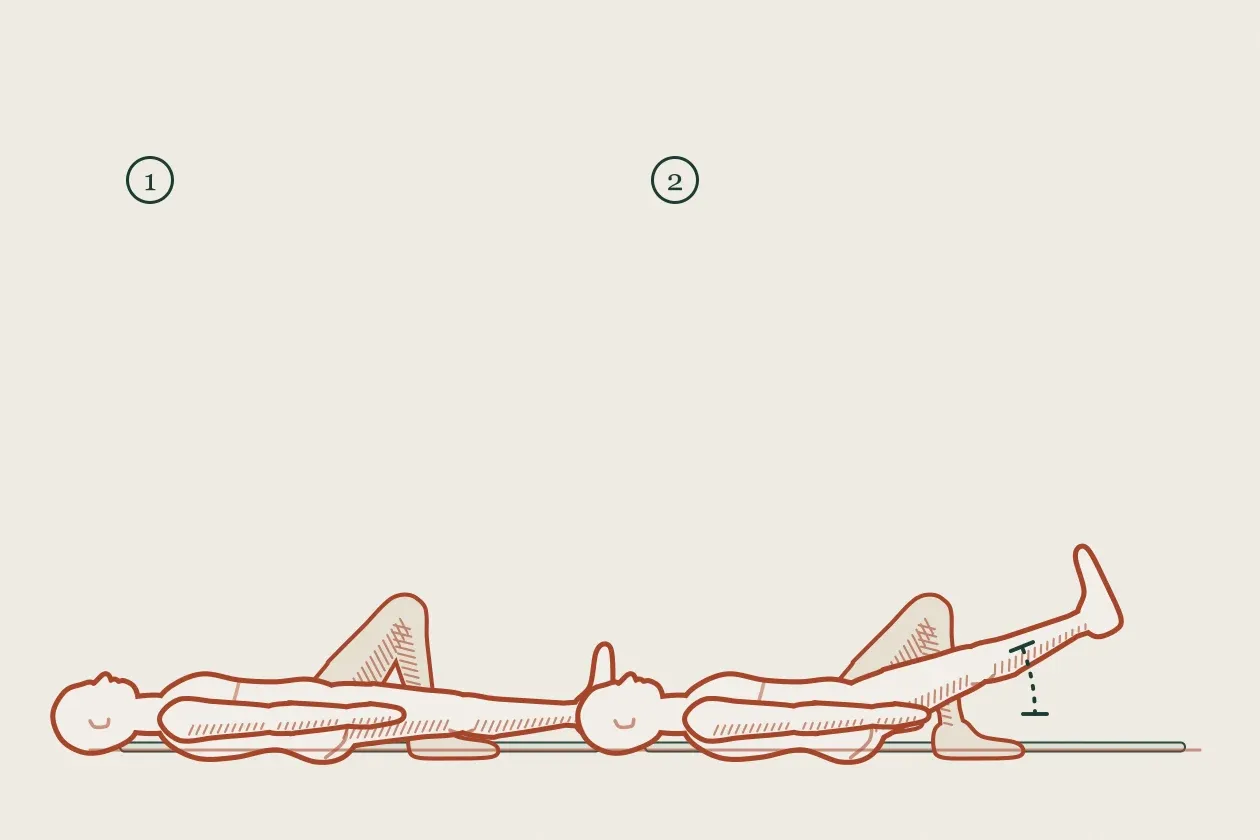
Exercise drawing in two steps: a figure lying with one knee bent, then lifting the straight leg

Straight leg raise

For after an ACL reconstruction, knee

  1. Lie on your back, the other knee bent.
  2. Tighten the front of the thigh so the knee pushes straight.
  3. Keeping it tight, lift the leg to the height of the other knee.
  4. Hold for three seconds and lower slowly.

3 sets of 10, as your surgeon’s protocol allows.

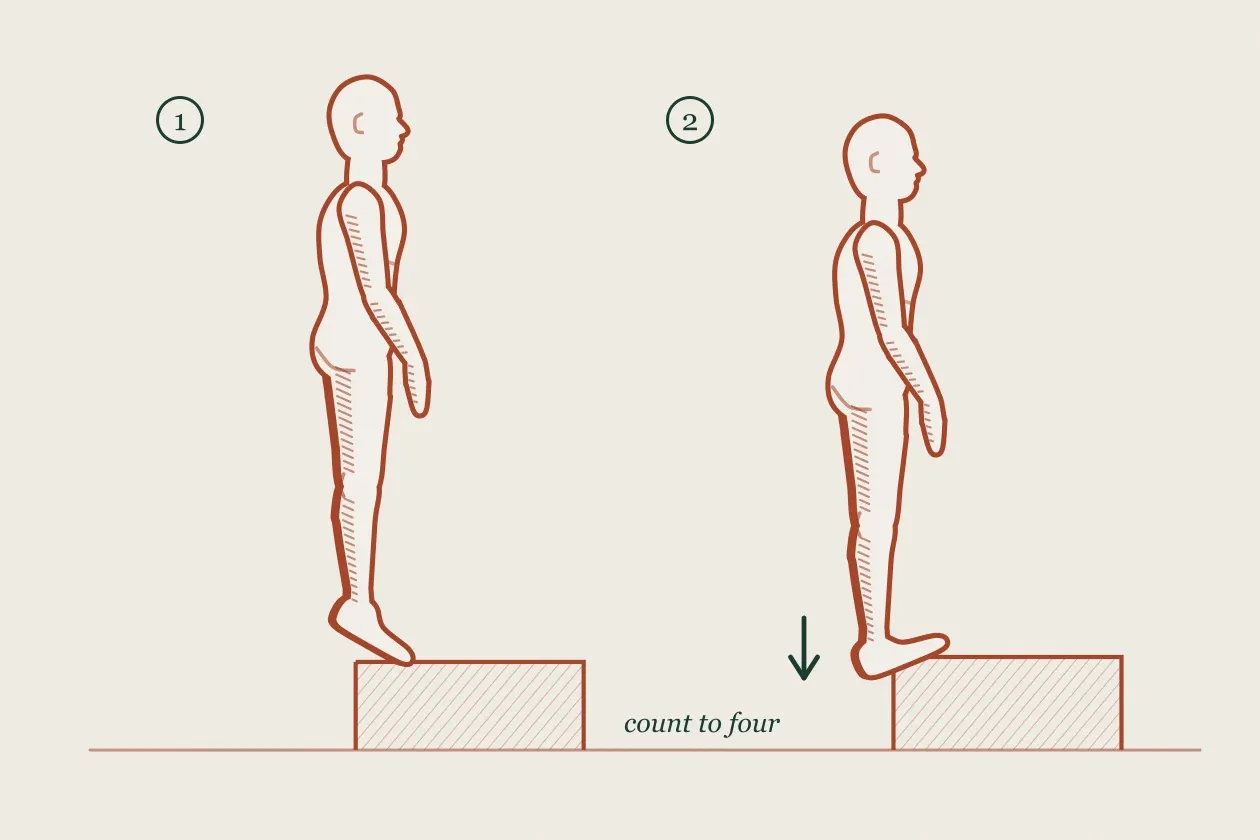
Exercise drawing in two steps: a figure on the edge of a step up on the toes, then lowering the heel below the step

Heel raises on a step

For achilles tendon pain, ankle and foot

  1. Stand on the edge of a step on the balls of both feet, holding the rail.
  2. Rise up onto your toes with both feet.
  3. Shift your weight onto the sore leg.
  4. Lower the heel slowly below the step, counting to four.

3 sets of 15, once a day. Pain up to 3 out of 10 is fine if it settles by the next morning.

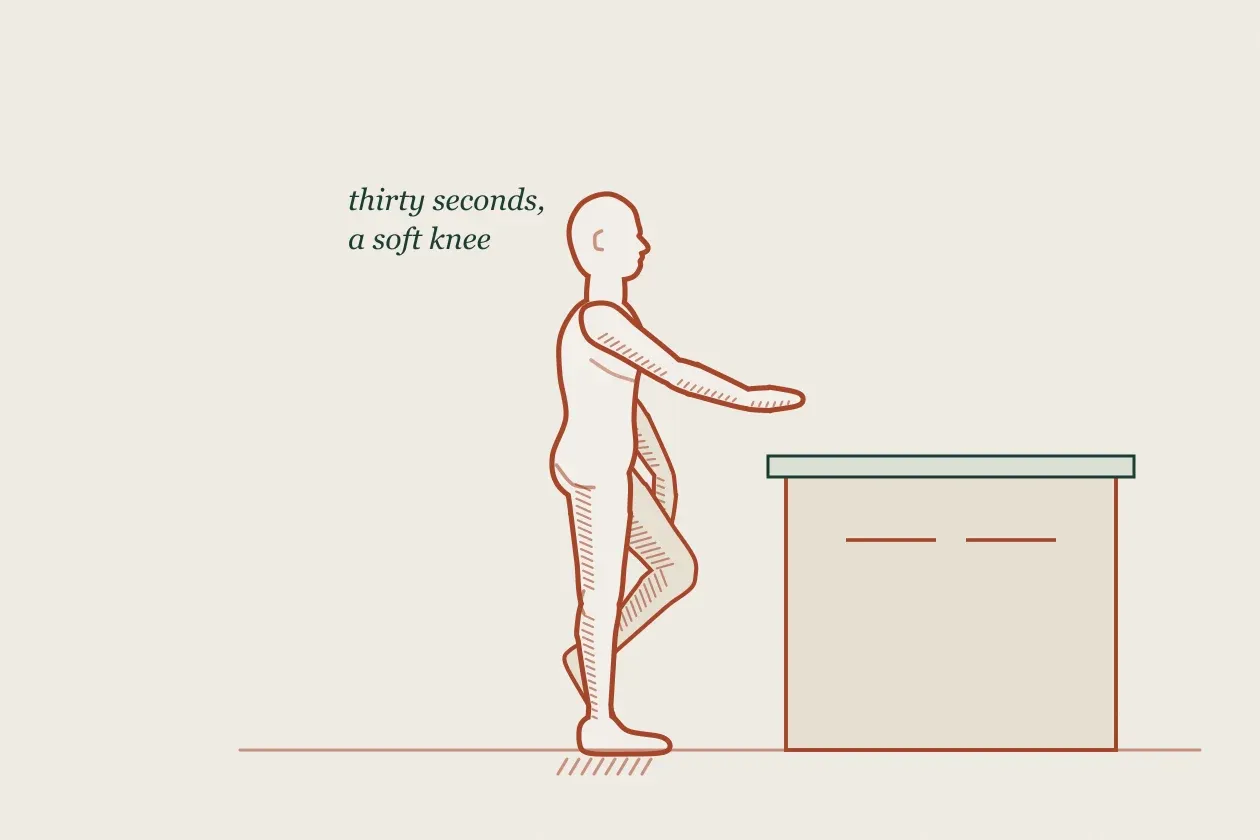
Exercise drawing: a figure balancing on one leg beside a kitchen counter

Single-leg balance

For sprained ankle, ankle and foot

  1. Stand near a wall or the kitchen counter.
  2. Lift the good foot and balance on the sore one.
  3. Hold for thirty seconds, with a soft knee.
  4. When that is easy, close your eyes or turn your head slowly.

3 times 30 seconds, twice a day. Brushing your teeth is a good time.